Monday, October 29, 2012

Apple Crisp

I love apples. The apple is one of my must-have foods. It stands on its own. It accompanies other foods, like natural peanut butter. Or it can get fancy.

Apples bake well. Apple Crisp is the second-best way to bake apples. The first, of course, is apple pie, but I'll save that for another day.

Apple Crisp tastes wonderful, makes your home smell great while it is baking, and it is easy to make.

First, make the topping. If you slice the apples first they might get a little brown. This is enough topping to cover apples arranged in a 9"x13" baking pan.
Apple Crisp Topping

Mix together with hands or pastry cutter:
1 1/3 C sugar
3/4 C whole-wheat flour
1 1/2 C rolled oats
1 1/2 tsp. cinnamon
1 tsp. nutmeg
1/2 tsp. cloves
2/3 C butter

Next, prepare the apples. I like to use empire apples because they are my favorite apple. But there are lots of other varieties that work well, too.
Wash, core, peel, and slice 8 or 9 medium apples. You need 8 cups of apple slices. Arrange them in a 9"x13" baking pan. You do not need to add sugar to the apples or grease the pan.
After that, sprinkle the topping over the apples. Bake at 375 degrees for about 45 minutes.

This tastes good warm or cold; by itself, with a glass of cold milk, or with vanilla ice cream. I can also verify that the time of day or night that you eat it doesn't matter.

You can make the topping ahead of time or make extra for another time. It stores well in the refrigerator for a short time or in the freezer for a longer time. I don't know how long because mine never stays there very long.

Substitute pears for apples and you will have a delicious Pear Crisp.

Wednesday, October 24, 2012

Pumpkin-Oat Muffins

Batters for quick breads like banana bread and zucchini bread can almost always be used to make muffins. That's how this recipe came to be. Originally, it was called Pumpkin-Oat Bread and was baked in a cake pan. As muffins, it works really well.

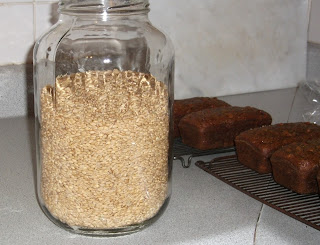
I didn't have any quick oats. I wasn't sure how rolled oats would work, since there isn't a lot of liquid to soften them up. I tried coarsely grinding the rolled oats, but they wouldn't go through the mill very easily. So I thought I would try coarsely grinding oat groats. It worked! It looked like fine instant oatmeal.


For context:
Back: oat groats and rolled oats; Front: coarsely-ground oats

And now, the recipe:

Pumpkin-Oat Muffins

Stir together and set aside:
1 1/2 cups (6.4 oz.) whole-wheat flour (soft white wheat flour)
1 1/2 cups (4.9 oz.) uncooked quick oats
1/4 tsp. salt
1 1/2 tsp. pumpkin pie spice
2 1/2 tsp. baking soda

In a large bowl, cream:
1/2 cup butter, softened
1 1/2 cups packed light brown sugar
Add and beat until light:
3 eggs
Add and mix well:
2 cups canned pumpkin

Stir the dry ingredients into the wet ingredients all at once, mixing gently but thoroughly. Fill 24 greased muffin cups about ¾ full. If desired, sprinkle ¼ cup chopped walnuts on top of the muffins. Bake at 350°F for about 20-25 minutes, until tops spring back when lightly touched. Remove from tins and cool on rack.

Tuesday, October 23, 2012

Old-Style Pumpkin Muffins

These days when you buy a muffin, it's likely to be huge and taste as sweet as cake. This wasn't always so. I'm old, and when I was growing up, muffins were only slightly sweet. They were usually fairly plain. You ate them when they were freshly-baked and warm, with butter and honey or jam. They were served as part of a meal, typically breakfast, and they were considered to have nutritional value.

My girls went to Bernice M. Wright Nursery School. It was a cooperative school, and one of the parental responsibilities was to provide the snack periodically. According to the snack policy, you could take in home-made items, but not cake or cookies. One time when it was my turn for snack, I baked muffins. Carrot-Pineapple Muffins. All of the adults loved them and asked for the recipe. I always "forgot" to take them the recipe, because I used my Carrot-Pineapple Cake recipe. I just baked the batter in muffin tins and didn't frost them. Because I called them muffins, they were perceived to be nutritious.

I won't say that most muffins ever were all that nutritious, but there is definitely a lot more sugar in most muffins today than there used to be.

The pumpkin muffin recipe I used today is from an old Betty Crocker cookbook, which was the "new and revised" edition in 1978.


I tweaked the recipe a little bit, but these are still old-style muffins. They should be eaten while warm, with butter and honey or jam.

Pumpkin Muffins, 1978-Style

Stir together and set aside:
2 C whole wheat flour (8.5 oz.)
1/3 C sugar
3 tsp. baking powder
1 tsp. salt
2 tsp. pumpkin pie spice

In a large bowl, beat:
1 egg
Add and stir in:
¾ C milk
¼ C canola oil
¼ C unsweetened applesauce
½ C pumpkin
½ C raisins

Stir the dry ingredients into the wet ingredients all at once, just until flour is moistened (batter will be lumpy). Fill 12 greased muffin cups about ¾ full. Bake at 400°F for about 20 minutes, until tops spring back when lightly touched. Remove from tins and cool on rack.
My tweaks: I used flour made from soft white wheat. The original recipe called for all-purpose white flour. It called for 1/2 cup vegetable oil and didn't specify a type. I prefer canola oil for something like this. Also, I almost always cut the amount of oil in half and replace it with unsweetened applesauce, as I did in this recipe.


Monday, October 22, 2012

It's a Great Year For Pumpkin

While we don't have our usual abundant apple crop this year, we do have a great pumpkin harvest. It turns out that pumpkins thrive in dry weather. So, every day this week I am going to use pumpkin to bake a different kind of muffin.

Today's recipe is based on a pumpkin muffin recipe that I first heard about at Weight Watchers. I don't know if it originated with Weight Watchers, but we called them--

Weight Watchers Pumpkin Spice Muffins

1 package spice cake mix, dry
1 15 oz. can pumpkin
2 apples, peeled and diced
Mix everything together well. Place in greased muffin tins, dividing evenly into 24 muffins. Bake at 425 degrees for about 12 minutes, or until a toothpick inserted in the center comes out clean. Remove from tins and cool on rack.

Very easy! And low in points. Lacking fat and eggs, the texture is a little chewy, but they are tasty.

Somewhere I picked up the idea to top the muffins with chopped walnuts (1/4 cup total) and cinnamon-sugar or Splenda (mix 1 tsp. cinnamon with 2 Tbsp. sugar or Splenda). It's surprising how satisfying that little bit of walnuts is!

Another idea, suggested by my friend Debbie, is to add 1 cup (6 oz.) of cinnamon chips to the original mixture.They add a lot of flavor!

I wanted to make them using whole-wheat flour, so, in place of the spice cake mix, I used the dry ingredients in my mom's Buttermilk Spice Cake recipe.


In the past I've used whole-wheat flour from hard wheat and the muffins have been delicious. Today I used whole-wheat flour from soft wheat, and they were even better.

You might notice bits of red in the pictured muffins. That's because I didn't peel the apples. They are just fine that way--probably tastier! And I hate peeling apples!

Here is my version:

KSD's Weight Watchers Pumpkin Spice Muffins


2 C + 2 Tbsp. whole wheat flour (255 g)
1 C sugar
¾ C brown sugar
½ tsp. salt
1 tsp. baking powder
¾ tsp. baking soda
¾ tsp. ground cloves
1 tsp. ground cinnamon
15 oz. canned pumpkin (or 2 C pureed squash)
2 small apples, not peeled; (finely) diced
¼ C walnuts, chopped
2 Tbsp. cinnamon-sugar mixture (Mix together 2 Tbsp. sugar [or Splenda] and 1 tsp. cinnamon.)
cooking spray

Mix whole wheat flour, sugar, brown sugar, salt, baking powder, baking soda, cloves, and cinnamon together. Because of the brown sugar, a pastry cutter is helpful. Stir in the pumpkin and apples until well-blended. Grease muffin tins with cooking spray. Divide the batter among 24 muffin cups. Sprinkle the walnuts on top of the muffins. Sprinkle the cinnamon-sugar mixture on top of the walnuts. Bake in a 425°F oven about 12 minutes, or until a toothpick inserted in the center comes out clean. Remove from the tins and cool on the rack.

Yields 24 muffins

Peter Piper Picked a Peck of Pickled Peppers

Peter Piper picked a peck of pickled peppers.
If Peter Piper picked a peck of pickled peppers,
Where's the peck of pickled peppers that Peter Piper picked?
I don't know about picking pickled peppers, but my friend Debbie sure knows how to pickle picked peppers. She gave me a jar!
When I opened the jar, my nose received a whiff of heaven.
After a taste, I could have snacked on them until they were gone. This is not a product you can buy. Unless you know Debbie or someone else who can create these. I just don't believe they can be factory-produced.

I decided to make a sandwich with them. I put a slice of my favorite go-to bread on the Foreman grill--my own whole-wheat bread. I don't believe bread this good can be factory-produced either. I topped the bread with slices of colby jack cheese and then piled on some peppers.
I keep the cheese slices thin so I can add a couple on top. When they melt, they help keep everything in place.
Another slice of bread, as it's problematic to grill open-faced sandwiches.
It's done!
It was heavenly! It was a little too good. I ended up making a second sandwich.

Monday, October 15, 2012

Cinnamon Rolls (Updated 8/18/13)

I can't think of anything that tastes better than freshly-baked cinnamon rolls, still slightly warm from the oven.

My recipe is from my Aunt Betty. It starts with her basic roll recipe. So I'll share that with you and add what you need to know and do to make cinnamon rolls.

But first, a few words about flour. Cinnamon rolls should be light and tender. I grew up using white all-purpose flour, described by King Arthur Flour as "the perfect go-to flour for all your baking needs." It works great! The only problem is, it doesn't have much nutritional value. (Here's a chart comparing nutrients in whole-wheat flour and white flour. Scroll down to see a chart that shows nutrients lost in the refinement process.) I used to just consider cinnamon rolls a lost cause nutritionally--they have a lot of sugar and a fair amount of fat, though not as much as you might think. But, with soft white wheat available now, we can replace at least part of the white all-purpose flour with whole-grain flour, still maintain the light color, mild flavor, and tenderness we desire, but boost the nutritional value.

And now, the recipes:
Dinner Rolls
3 C lukewarm water
2 T yeast
1 C sugar
½ C canola oil
½ C instant potato flakes
1 C instant nonfat dry milk
1 ½ tsp. salt
3 eggs
8-9 C unbleached all-purpose flour, or use soft white whole-wheat flour for 1/3-1/2 of the total flour amount
Dissolve yeast in water in large bowl. Let sit for a few minutes. Add sugar, oil, potato flakes, dry milk, salt, and eggs. Add 3 C of the flour. Beat with mixer until smooth. Kneading by hand or with dough hook, add enough flour to make soft dough (5-6 C). In oiled bowl, let rise once or twice. Shape into rolls and place in greased pans; let rise. Bake at 350°F until brown, about 20 minutes.
Cinnamon Rolls

After rising in the bowl, punch down dough. On a floured surface, use your hands to pat the dough (half of it at a time) into a rectangle, and brush with melted butter (about 6 T in all). Top with a mixture of ¾ C sugar and 6 tsp. cinnamon. Roll up the dough; cut into ¾-1 inch widths; place onto greased pans leaving space to rise; let rise. Bake at 350°F for about 20 minutes. While hot, top with glaze.

Glaze: Combine 1 lb. (3¾ C) powdered sugar, ⅜-½ C hot water, and 2¼ tsp. vanilla.

Update, 8/18/13: This makes a lot of rolls. You can easily halve the recipe. When you do, I suggest using 2 eggs, but it's fine to just use 1.


Sunday, October 14, 2012

I Can't Believe It's Whole Grain Pumpkin Bread!

There is something to be said for the process of cooking pumpkin--finding the right kind of pumpkin, cleaning out the seeds (and cooking them separately, because pumpkin seeds are delicious), baking the pumpkin, scraping the meat from the skin, and puréeing it--which leaves you with lots of Pumpkin Goodness to use in many recipes. But there's also something to be said for opening a can of pumpkin purée, which is what I did when I made pumpkin bread yesterday.

I've been experimenting with different whole grain flours. While I've often made pumpkin bread and other such breads with whole wheat flour, I've always used the flour from hard red wheat. It's delicious and works really well. But recently I've been trying out hard white wheat and soft white wheat flours. They both have milder flavors than the red wheat flour. The soft white wheat flour is very light and  fine--like pastry flour. I had trouble figuring out how much more to use, though. King Arthur Flour website came to my rescue! So yesterday I took some soft white wheat:

 I ground it into flour:

And made pumpkin bread, with raisins and walnuts:

And with cranberries and walnuts:


I gave most of it away (portion control, sort of). I didn't tell anyone that it was whole grain. I hope they enjoy it, and the fact that it is whole grain is a bonus. 


Pumpkin Bread

2 C (8.5 oz.) flour (I use soft white whole wheat flour)
2 C sugar
2 tsp. cinnamon
2 tsp. baking soda
½ tsp. salt
4 eggs
1 C oil (such as canola oil) (or ½ C oil and ½ cup applesauce)
2 C pumpkin, canned (Cooked and puréed pumpkin or squash works well, also.)
1-2 C raisins or nuts (optional)

Mix together dry ingredients. Mix together wet ingredients. Combine wet and dry ingredients. Add raisins and/or nuts, if used. Pour into greased and floured pans. Bake at 350 degrees for 30-40 minutes.

Yields 2 regular loaves or 6 mini loaves.


Baking Buddy

This spider has been living outside of my kitchen window for several weeks now.


She keeps me company. No words in her web yet, though.

Tuesday, October 9, 2012

Measuring Cups and Flour Tortillas

Nerd Alert: If you are not fascinated by measuring cup adventures, you may just want to skip to the end for the flour tortilla recipe.

I used to take measuring cups for granted. I presumed that they all measured the same amounts. Last summer I found that this isn't necessarily so.

Our family rented a house on a lake. The second day there I made tortillas for chicken enchiladas. My recipe always worked great, whether I halved or doubled it; whether I used white or whole wheat flour. But on this day, when I was making enough for 16 people, the dough turned out very dry. I managed to renovate it, and the tortillas, though not my best, were still good. But I couldn't figure out what happened.

Later in the week I noticed a set of dry measuring cups different from the ones I had used for the tortillas. I noticed that the 1-cup I used to measure the flour for the tortillas appeared to be bigger than the other one. So I took a liquid measuring cup, measured 1 cup of water in it, and poured it into the first cup. There was unfilled space. Quite a bit of it. The water fit exactly into the second cup. I even poured the water back into the liquid measuring cup to make sure the amount was constant. It turned out that the first "cup" held about another 1/4 cup! With 5 cups of flour called for in the tortillas, that meant I had added  about 1-1/4 cups too much! No wonder the dough was so dry!
Whole Wheat Tortillas
At home I have a few different sets of measuring cups, so I thought I would compare 1-cup amounts.
 The red (Betty Crocker) cup was labeled 1 C/235 ml, so I weighed it with 235 ml (grams) of water in it. The water filled it perfectly to the brim. I poured the water and weighed it in the orange and white dry measuring cups. The 235 grams remained constant and the water filled them perfectly to their brims as well. Next I poured the water into the Betty Crocker liquid measuring cup. The water came right up to the 1-cup line and weighed 235 grams. Then I poured the water into my Pyrex 2-cup measure. The 235 grams of water rose markedly above the 1-cup line. I had to take out 25 grams of water, or 5 teaspoons, for it to match the 1-cup line at 210 grams. Poured into my Pyrex 1-cup measure, 235 grams of water rose slightly above the 1-cup line. To match the 1-cup line, I had to take out 11 grams of water, or 2 teaspoons, and it weighed 224 grams. So Pyrex didn't come out looking so good.

Wikipedia: "The cup currently used in the United States for nutrition labeling is defined in United States law as 240 mL." King Arthur Flour: "1 cup = 227 (or 230) ml/g." This discrepancy of standards, about 1 tablespoon difference, surprised me. At 235 ml/g, most of my measuring cups fall in the middle of this range and are consistent with each other. Interestingly, both Pyrex measuring cups not only fall below this range but are inconsistent with each other.

Flour Tortillas
5 C flour (originally called for white, but I use whole wheat)
2 1/2 tsp. salt
3 tsp. baking powder
1 1/2 C very hot water
5 Tbsp. canola oil (originally called for shortening; oil works really well)
Mix together dry ingredients. Pour oil into the hot water. Then pour the liquids into the dry ingredients. Stir together with a spoon, and then squish together with hands and knead slightly until you have a cohesive ball. You may need to add a bit more water or flour.  Make about 20 golf ball-sized balls of dough. Cover them with a towel or wax paper so they don't dry out. Let rest for a few minutes. Using a little flour, roll each ball very thin. Cook in a dry skillet on high heat, turning as soon as it starts to bubble; cook for a few more seconds. Do not over-cook. Place cooked tortillas inside a folded tea towel.

Making 20 tortillas all at once can be tedious. So, if I just need a few, I decrease the recipe amounts as follows:

1/3 Recipe: (yields 6-7 tortillas)
1 2/3 C flour
3/4 tsp. salt
1 tsp. baking powder
1/2 C very hot water
1 2/3 Tbsp. canola oil

 
1/5 Recipe: (yields 4 tortillas)
1 C flour
1/2 tsp. salt
1/2 tsp. (generous) baking powder
1/3 C (scant) very hot water
1 Tbsp. canola oil

Monday, October 8, 2012

Seasonal Sandwich

A friend gave me some tomatoes from his garden yesterday. The season for garden-ripened tomatoes is short and fast growing to a close. So I decided to make this seasonal sandwich for breakfast today:


Chop a clove of fresh garlic and spread it on a slice of home-made 100% whole-wheat bread. Add slices of mozzarella cheese. (I slice the cheese very thin and use only about 1 ounce in all. Today I used colby-jack cheese because I didn't have any mozzarella.) Add slices of fresh-from-the-garden tomato. Grind a little pepper on top. Add fresh basil leaves. Add a couple more slices of cheese. Top with another slice of home-made 100% whole-wheat bread. Toast in the Foreman grill (or equivalent) until cheese melts. Eat immediately!

Ready to grill!

Ready to eat!

I used bread that I had made with hard white whole wheat. In case you are unfamiliar with it, white whole wheats, both soft and hard, are newer wheat strains, but they are nutritionally similar to their red wheat counterparts. The main difference is the lighter bran has a milder flavor, so bread and other products using these white wheats have a milder flavor. I'm offering White Whole Wheat Bread made with 100% white whole wheat flour in this Friday's baking. So, if you are interested in ordering some, e-mail me at ksimmonsd@gmail.com and I will send you an order sheet.

I'm also baking Cracked Wheat Bread this Friday, using my Aunt Betty's famous recipe. Well, it's famous in our family and in Moses Lake, Washington, and surrounding communities!

Cracked Wheat Bread--Updated

Today I'm going to bake Cracked Wheat Bread using my Aunt Betty's recipe. Just thinking about it brings back a flood of happy memories from my childhood. She was--and is--a great cook, among her many other talents and abilities. I spent lots of time at her any my Uncle Frosty's farm while growing up, and it always involved home-made bread which was likely to be Cracked Wheat Bread.

My electric grain mill doesn't grind coarsely enough for cracked wheat, so I use my hand mill. It does a good job. I've made whole wheat bread using this mill to grind all of the flour. It's a little time-consuming and the flour is not quite as fine as the flour milled in my electric one, but it's fine enough. In fact, I have a friend who, when her husband was a medical resident, used this same model hand mill to grind all of her flour for baking bread. She did have a couple of boys who helped her.
My hand mill

Whole-grain wheat and cracked wheat

I'm baking Cracked Wheat Bread in this Friday's baking. So, if you are interested in ordering some, e-mail me at ksimmonsd@gmail.com and I will send you an order sheet.

I'm also baking White Whole Wheat Bread made with 100% white whole wheat flour this Friday.

I'll update this post after the bread is baked!

The Cracked Wheat Bread is baked, and it looks and taste great!

Wednesday, October 3, 2012

FRESH Bread

One of the reasons I bake bread is because I love fresh bread. I mean really fresh bread. Warm out of the oven fresh bread. First day it's baked fresh bread. I eat it plain--no butter or anything else on it.

There are no added preservatives in the bread I bake, so it only stays fresh for two or three days. If I am not going to use it all during that time, I can put it (or part of the loaf) in the freezer. It will taste fresh when it thaws. If I only want to use a few slices at a time, I slice the bread before I put it in the freezer and then just take out the slices as I need them. More often than not, though, I just put the extra loaves of bread from the batch in the freezer and leave out the loaf I've started.

That's because I happen to like slightly-stale bread for lots of things. I put bread that I haven't used within a few days in the refrigerator. Refrigeration does not slow the staling process--in fact, it speeds it up--but it delays the growth of mold, which I aim never to have on my bread, because then I have to put it in the compost.

Some foods that I think are actually better with stale bread: French toast, toast, bread pudding, and sandwiches in the Foreman grill. Other great uses for stale bread, depending on the type: croutons, bread crumbs, French onion soup, and fondue. Okay, I've never actually served fondue, but I have eaten it. I think it was in the '60s when it was really popular. Remember--I'm old.

Fresh out of the oven

Monday, October 1, 2012

My Whole Wheat Bread: You Bake or I Bake

I want to share the whole grain happiness!
Some people have asked me for the recipe of my whole wheat bread. So here it is. Some of you may be interested in eating or trying whole wheat bread but don't want to bake it yourself. If you live in my area, I can bake it for you. If you are interested, e-mail me at ksdowning@gmail.com and I will send you information.


Whole Grain Bread

Dissolve:
1 Tbsp. yeast
in:
3 C lukewarm water
Let stand in a warm place until it starts bubbling (5 minutes). Beat in:
⅓ C honey
3 Tbsp. oil (I prefer canola oil.)
1½ tsp. salt
1 egg
Add and knead:
8 C whole wheat flour (more [most likely] or less, as needed)
  
Allow the dough to rise once in an oiled bowl and once in greased baking pans.
To bake, place loaves in a 400 degree oven. After 15 minutes, reduce the heat to 375 degrees and bake 25 minutes longer. Test for doneness. Remove the loaves at once from the pans and cool on a rack before storing.

Yields 3 loaves

Note: I use flour freshly-ground from hard red wheat. More on that another time!