Sunday, February 2, 2014

"I Want Just White Cookies."

Libby and I were making dinner, including, of course, dessert. I asked her what kind of cookies or brownies we should bake. She said, "I want just white cookies, with nothing in them." This was surprising! After all, she is her mother's daughter and my granddaughter. I was really expecting something to do with chocolate.

She said she ate cookies like this when she was with her mom at her mom's friend's house. Okay! So I googled "cookies" and we looked at cookie images ... until we came to this. She said that's what the cookies looked like. So we went to the site and found a recipe for Sugar Cookies that looked very promising.

I wish I had pictures of Libby and the cookies. That 6-year-old girl did a great job measuring, mixing, (I did the scooping) gently pressing the scoops of dough, and sprinkling sugar on them. I had a different focus while we were baking the cookies, so I failed to take pictures.

Libby declared the cookies good. Whew! They were what she had in mind. Hooray!

I loved the cookies, too. But I wondered if I could use white whole wheat flour rather than all-purpose flour. That gave me just the excuse I wanted to bake (and eat) Sugar Cookies--by using white whole wheat flour!

The answer is yes.


They have all of the buttery, vanilla-y, sugary goodness of the all-purpose flour version. Except for the bit of texture the bran gives--which I really like--I bet no one would guess these are made with white whole wheat flour. They're just delicious.

When you go to Blissfully Delicious you  will find the recipe. You will see that it was slightly adapted from Martha Stewart Cookies. My recipe is slightly adapted from Blissfully Delicious, and I call them

Libby's Sugar Cookies
Ingredients:
3 C (12.8 oz.) all-purpose flour or white whole wheat flour
1 tsp. baking soda
1/4 tsp. salt
1 3/4 C granulated sugar
1/4 C packed light-brown sugar
1 C unsalted butter, softened
2 large eggs
1 tsp. vanilla
Sugar, for sprinkling
Directions
Preheat oven to 350 degrees. Stir flour, baking soda, and salt into a bowl; set aside.
Mix butter and sugar until pale and fluffy in a mixer with paddle attachment, about 2-3 minute. Mix in eggs, 1 at a time, and then vanilla extract. Reduce speed; gradually add flour mixture, and mix until just combined.
Scoop dough, rounding slightly; space cookies 2 inches apart on parchment-lined baking sheets. Flatten cookies slightly with the bottom of a cup swished in sugar. Sprinkle tops with sugar.
Bake cookies until golden, about 15 minutes. Let cool on sheets on wire racks for 5 minutes. Transfer cookies to racks; let cool completely. Cookies can be stored in an airtight container at room temperature up to 3 days. (This sounds like it could be true, but I'll never know. Cookies never last that long in my house.)
Yield: About 3 dozen cookies
I don't have an ice cream scoop, so I just gently rounded the spoonfuls of dough.
I used the bottom of a cup swished in sugar to gently flatten the tops of the cookies. Then I sprinkled regular white sugar on top, using my fingers.
Cookies cooling on the rack. I left them in the pan (sitting on a cooling rack) for 5 minutes. Then I took them out of the pan and removed them from the parchment paper.


Friday, November 29, 2013

Pies!

For our family Thanksgiving feast yesterday I baked two apple pies, one pumpkin pie, one mincemeat pie, and three and a half dozen butter tarts. I also made a creme de menthe pie. Including the pumpkin cheesecake my son-in-law Dane baked, we had plenty of desserts!

So why, then, would I need to bake this apple pie today?


My daughter Karlyn and her husband Ti were taking the leftover apple pie home last night. Set on top of the car while putting other things inside, it slid off and landed top-first on the snow!

So today's pie takes its place.

Lard is Not a Bad Word

Until last year, I always made pie crust using shortening. My mom, an excellent pie baker, always used Crisco, so that's what I used.

I don't really know where my negative associations with lard came from, but I always associated lard with disgusting fat--literally and figuratively.

A few years ago, health concerns became linked with trans-fats, which are present in any hydrogenated or partially hydrogenated fat. The amount present in vegetable shortenings has been reduced to the point that they can legally say 0 grams per serving, but there is a trace of it in any hydrogenated or partially hydrogenated fat.

I looked into alternatives for shortening in pie crust. I ruled out oils and butter. I knew that lard was used traditionally before shortening. My mother-in-law always made her pie crusts using lard. They were flaky and tender, but my general negative perception of lard persisted, and it took me a long time to try it. This article helped me shift my perception.

About a year ago, I finally tried it. I liked it! My pie crusts were still flaky and tender. They tasted better. And the dough was easier to handle.

The lard that's typically available in the grocery store is hydrogenated. But, according to Wikipedia, it contains half the amount of trans-fat as does shortening. So, my next step is to find lard that is not hydrogenated. A year ago, someone suggested that I go to a butcher shop (there are a few left) to buy the lard they trim from the pork. I put it off, so I have continued to use the hydrogenated lard. Just now, a quick Google search led me to the grocery store Save-a-Lot. That store is not very far from me. But, if it is available there, it might also be available at Price Rite, which is very near me.

Pie Crust Recipe

2 C (8.5 oz.) all-purpose flour
1 tsp. salt
2/3 C + 2 Tbsp. (6.25 oz.) lard
4+ Tbsp. cold water

Stir together flour and salt; cut in the lard. Add enough water to be able to squish together the dough. Cut the dough in half; roll out each half.

Makes one 2-crust pie or  two 1-crust pies.

Note: This dough cutter/scraper is one of my best baking buddies. Use it to cut up the lard as you add it to the flour. After you have squished the dough together, use it to cut the dough in half. When you are lifting the dough to place it in the pie pan, if it is sticking, gently use this tool to pry it up.

Leftover Pie Crust Dough

Squish together all of the dough scraps from the first rolling out, adding a little--less than a teaspoon--of lard to make up for the extra flour that has been rolled in.

Today I got a dozen tart shells out of the second and third dough rollings. I have a doughnut cutter that is missing the middle part, so it cuts a 3 1/2-inch circle. I set the circles of dough in muffin tins. You may prick the dough with a fork if you like, but I don't bother. Bake at 450 degrees for about 8 minutes. Let set for a few minutes before removing them from the pans.


In Canada, tarts are very common, so they have real tart pans, which are like shallow muffin tins.

You can fill these with just about anything you want, from jam or pudding to lemon cream or chocolate mousse.


Monday, September 30, 2013

Lemon Ricotta Cookies

What do you do with ricotta cheese other than make lasagna? I only buy ricotta cheese when I plan to make lasagna or something similar, like stuffed shells.

Last summer I bought ricotta cheese to make lasagna for the extended family. So I bought the 2 pound container. Then we ended up not making lasagna. So that ricotta cheese sat in my refrigerator until today, with its "use by" date of July 20, 2013. It appeared to have no spoilage, though, so, at the suggestion of a friend, I decided to make Lemon Ricotta Cookies. (I also had some not-so-fresh-anymore lemons that needed to be used.)

I found the same recipe at three different websites, so I decided that must be the recipe to try. Find it here, here, and here.

I made a couple of changes to the recipe. Instead of all-purpose flour, I used whole wheat flour. I had some hard white wheat flour and some soft white wheat flour. I needed a bit more, so I also used some hard red wheat flour. The recipe calls for whole milk ricotta cheese. Mine was part skim. I also made them bigger than suggested.

The cookies were easy to make and tasted very good. Even my son, who isn't particularly fond of lemon and couldn't fathom why anyone would make cookies with ricotta cheese, liked them.


I still have a pound of ricotta cheese left. Any suggestions?

Monday, September 2, 2013

My New-to-Me Wheat Mill

My friend gave me her Magic Mill.


These don't appear to be manufactured any more, but at one time they were the wheat mill of choice for people who ground their own flour. My friend bought hers in the 1970's. So did my parents. My oldest sister had one. I knew a lot other people who owned them, too.

My K-Tec Kitchen Mill next to the Magic Mill:


The size difference is obvious! Believe me, there is a corresponding weight difference as well. I don't mind moving the Kitchen Mill from its home to the counter to use it. The Magic Mill is too big to live on the counter where it is used, but too heavy to lug around easily.

I will put up with its inconveniences for its benefits.

The Magic Mill is a stone grinder. Here you can see the stones. The wheat feeds into the hole and then is ground between the stones.


The metal plate that fits over the stones makes it a lot easier to feed the grain into the hole!


Here's the pan that slides into the bottom drawer to collect the flour:


It's really easy to collect the flour and then go on with more milling. With the Kitchen Mill, I have to brush off all of the surfaces after each batch of flour. With the Magic Mill, I can wait until I'm completely finished milling before brushing everything off.

The Magic Mill doesn't mill flour quite as fine as the Kitchen Mill does.


But it has a wider milling range, so it can crack wheat. Up until now, I've just been using my hand mill to crack wheat.


If I had to choose one over the other, which would I choose? I'm not sure.

If you are interested in learning about grain mills, Pleasant Hill Grain is a good place to start. We (my former husband and I have joint custody of the Kitchen Mill) bought the Kitchen Mill in the early 1980's. Pleasant Hill Grain doesn't sell it, but you can go to Harvest Essentials to learn about the current version. (Other than the addition of Blendtec in its name, I can't see any difference.)

Here's my dream mill!


Monday, August 26, 2013

That's What I Mean By Fresh Bread!

This morning--

The ingredients


A few hours later--

Fresh bread!


Some in between steps--

From grain to flour:


Bread dough kneaded and ready to rise:


In the bowl:
(I thought there was something wrong with my camera, but it's the reflection of the dough in the shiny bowl.)


The dough has risen:


Panned bread dough:


The dough has risen again:


Reprise: Freshly baked bread!


I wonder how long from grain to flour for this loaf of bread. I wonder how long from oven to shopping cart. (And Pepperidge Farm is a better brand!)


Wednesday, August 14, 2013

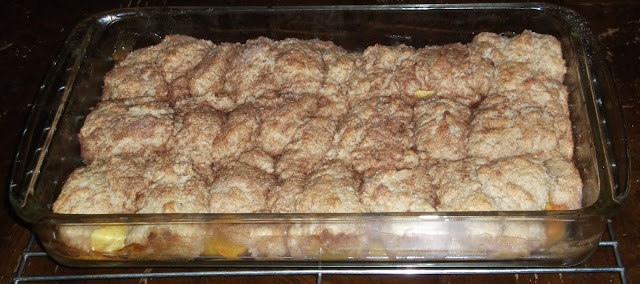
Peach Cobbler

I love fresh peaches. In season, locally-grown peaches. Bite into such a peach for sweet bliss.  Pair it up with cream--ice or whipped--for yet more bliss.

But top the peaches with biscuit dough and call it peach cobbler? I've never been a big fan. The biscuits are too pasty, too bland.

Then I ate peach cobbler that my daughter-in-law Tiffani made. Using the peaches from their Very Own Peach Tree. So you know the peach part was delicious. Happily, I liked the biscuit part, too! There was more texture and more taste. What was different? Whole wheat flour.

Today I made peach cobbler using Tiffani's recipe for the biscuit dough.When I compared her recipe to the one I've used in the past, I saw that hers uses more butter and more sugar. I'm sure that further enhances taste and texture.


I like the touch of cinnamon-sugar sprinkled on top.

I could have used more peaches, but it's difficult to keep peaches this good around!

This peach cobbler called for its equal in ice cream: Gannon's vanilla!


The recipe:

Peach Cobbler  (from Tiffani Downing, based on Joy of Cooking, 75th Anniversary Edition)

Preheat oven to 450 degrees.

Blanch and peel about 8-12 peaches. Slice them into a baking dish, 9"x13".

Top with Cobbler Biscuit Dough:
Mix together:
1 3/4 C white whole wheat flour
1 Tbsp. baking powder
1/2 tsp. salt
2 to 4 Tbsp. sugar, to taste [I used 3 Tbsp.]

Using a pastry blender or two knives, cut in 4 to 6 Tbsp. butter until the size of small peas. [I used 5 Tbsp.]

Make a well in the center. Add all at once:
3/4 C milk
Stir just until the dough comes away from the sides of the bowl.

After dropping this on top of the peaches, sprinkle it with cinnamon/sugar mixture.

Bake until golden brown and cooked through, 15 to 30 minutes.
Serve warm with ice cream or whipped cream.

Friday, August 9, 2013

Wheat Berry Bread

Whole grains are good, right? Therefore, whole grain flour is good, right? Well, according to some sources, it depends.

First of all, in case you haven't met, let me introduce you to the Glycemic Index or GI. I won't go into a lot of detail, but, according to Wikipedia, "the glycemic index ... provides a measure of how quickly blood sugar levels ... rise after eating a particular food. ... A lower glycemic index suggests slower rates of digestion and absorption of the foods' carbohydrates ... . A lower glycemic response usually equates to a lower insulin demand."

The assertion some people make is that the less processed a grain is, the lower the glycemic index. That definitely makes sense if you are comparing, say, white flour to whole wheat flour. But what about whole wheat berries compared to whole wheat flour? One is the powdered version of the other, but, like a puzzle, all of the pieces are still there.

Here's what Andrew Weil, M.D. says:

"Grains in their natural form have a low glycemic index, while processed carbohydrates, including those made with flour or puffed grains, have a high GI. The reason is that it takes longer for digestive enzymes to reach the starch inside whole grains or grains cracked into large pieces, slowing down the conversion of starch to sugar.

"You can be pretty sure you're eating a natural grain with a low GI ranking if you have to chew it or can see grains or pieces of grains in food products. The more your jaw has to work, the better. But when grains are pulverized into flour, whether whole or not, their surface area expands dramatically, providing a huge, starchy surface area on which the enzymes can work. Consequently, the conversion to sugar happens very quickly."

I couldn't find any studies to confirm this. The one study I did find seems to refute it. Its conclusion: "The particle size of whole grain wheat flour did not substantially affect glycemic responses."

According to Livestrong, "Wheat berries have a GI value of approximately 46 [in the low range], according to the Glycemic Index Foundation's GI database."

I could not find a specific GI value for whole wheat flour.

What I did find over and over was more-generalized advice, such as this from Maria Collavo-Clavell, M.D., endocrinologist with the Mayo Clinic:

"Basic principles of the glycemic index diet may help you better manage and control your blood sugar:
  • Choose high-fiber foods, such as whole grains, legumes, fruits and vegetables.
  • Choose fresh or raw foods over canned or processed foods."
My real-life experience is that it is difficult to find whole grain products, period, and to be sure of what you are getting. Which is one reason why I bother buying grains and using them for cooking and baking, most often grinding the grain into flour first.

Having said all that, I decided to bake Wheat Berry Bread. It is my good old Whole Wheat Bread with wheat berries added.

I cooked the wheat berries in my rice cooker: 2 C wheat berries to 6 C water. I think if you just want to eat the wheat berries, as in a salad, you would use less water, about 1 C wheat berries to 2 1/2 C water. I wanted them to be quite soft, so I used the greater amount of water. I also soaked them over night first.


Here's a closer view of the cooked wheat berries:


I added 3 C of cooked wheat berries to my bread dough as I mixed it. The wheat berries add chewiness and a nutty kind of flavor. You can see them in the bread!


After it cooled, I tried a slice ... and another ... and another. Definitely a keeper! I used it to make the sandwich I ate for supper tonight. That's 1 clove of chopped garlic on a slice of bread, a thin layer of Jarlsberg cheese, a layer of cooked broccoli, to be followed by another thin layer of cheese, and topped with another slice of bread.


And then toasted.


Simple and delicious and nutritious.